Sadly, the shade is all wrong for me. It got me a bad case of lobster hands and it always looks very painted on. I can't tell you how many times I painted it on only to remove it seconds later. For as long as I've owned the polish, I have yet to wear it in all its glory. It is THAT bad on me. Suffice it to say, Chanel Mimosa is unflattering for my skin tone.
However, there's no reason to waste a perfectly good polish so I came up with a couple of ideas on how to rework Mimosa into something wearable on me.
1. Bubbly Mimosa
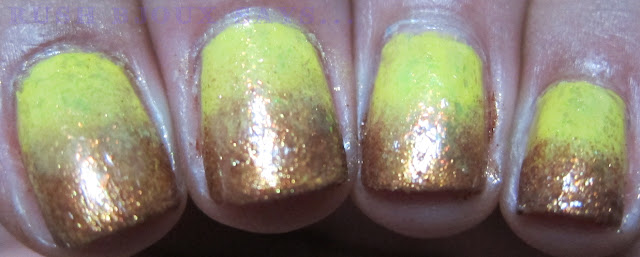
These bubbly-inspired nails also serve as my first attempt at gradation nails. You know, the one where you use sponge to create (somewhat) seamless gradation of 2 different colors.
I use China Glaze in Harvest Moon for this effect. Harvest Moon is a gorgeous shimmery copper and part of their Capitol Colors collection (a tie-in with the Hunger Games movie).
I still haven't mastered it yet but i think the uneven border makes for a nice bubbly-like effect.
This will definitely catch people's eyes, perhaps more appropriate for parties and celebrations.
I came up with the second idea after rummaging through my polishes collection and found several colors that looked so great together. I don't know if there's already a name for this effect but I call it 'Sprinkles Nails' because it consists of dots from several different colors - it's basically a 2D version of Ciate's Caviar nails and InStyle magazine actually ran an article of similar idea a few months back.
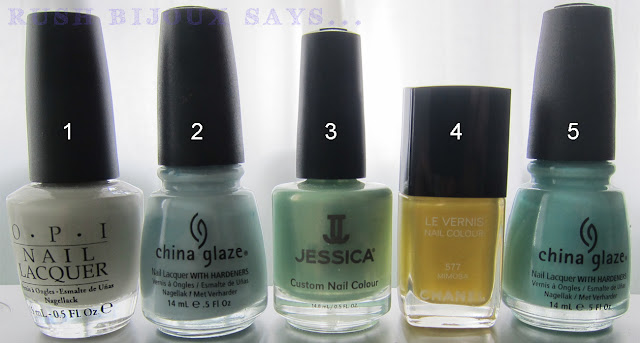
I use 5 different polishes for this effect: 1 for the base color, and the rest for the dots.
From left to right:
1. OPI Skulls & Glossbones as base color
2.China Glaze - Sea Spray
3. Jessica - Cloud Mine
4. Chanel - Mimosa
5. China Glaze - For Audrey
For the record, China Glaze - Sea Spray was the color that started it all for me. Before it came out, I was never such a polish fiend as I am right now. Then it came out and it started snowballing from there =D
 |
| Steps 1 - 5 |
The end result looks somewhat like the colors and pattern you'd use to decorate an Easter egg, hence the name of the design. Definitely eye-catching and not for the boardroom!
The good thing about Sprinkles Nails is that you can experiment with any colors, you can go with themes such as Christmas, Halloween, St. Patrick's Day, etc. or you can just go crazy and mix in any colors, the possibility is endless and each will yield unique result, every time.
Holiday is around the corner so Season's Greetings everyone! ^_^


No comments:
Post a Comment